Node.js Composition and Principle
1.1 Introduction to Node.js
Node.js is an event-driven single-process single-threaded application. Single threading is embodied in Node.js maintaining a series of tasks in a single thread, and then In the event loop, the nodes in the task queue are continuously consumed, and new tasks are continuously generated, which continuously drives the execution of Node.js in the generation and consumption of tasks. From another point of view, Node.js can be said to be multi-threaded, because the bottom layer of Node.js also maintains a thread pool, which is mainly used to process some tasks such as file IO, DNS, and CPU computing.
Node.js is mainly composed of V8, Libuv, and some other third-party modules (cares asynchronous DNS parsing library, HTTP parser, HTTP2 parser, compression library, encryption and decryption library, etc.). The Node.js source code is divided into three layers, namely JS, C++, and C.
Libuv is written in C language. The C++ layer mainly provides the JS layer with the ability to interact with the bottom layer through V8. The C++ layer also implements some functions. The JS layer It is user-oriented and provides users with an interface to call the underlying layer.
1.1.1 JS Engine V8
Node.js is a JS runtime based on V8. It utilizes the capabilities provided by V8 and greatly expands the capabilities of JS. This extension does not add new language features to JS, but expands functional modules. For example, in the front end, we can use the Date function, but we cannot use the TCP function, because this function is not built-in in JS.
In Node.js, we can use TCP, which is what Node.js does, allowing users to use functions that do not exist in JS, such as files, networks. The core parts of Node.js are Libuv and V8. V8 is not only responsible for executing JS, but also supports custom extensions, realizing the ability of JS to call C++ and C++ to call JS.
For example, we can write a C++ module and call it in JS. Node.js makes use of this ability to expand the function. All C and C++ modules called by the JS layer are done through V8.
1.1.2 Libuv
Libuv is the underlying asynchronous IO library of Node.js, but it provides functions not only IO, but also processes, threads, signals, timers, inter-process communication, etc., and Libuv smoothes the differences between various operating systems. The functions provided by Libuv are roughly as follows • Full-featured event loop backed by epoll, kqueue, IOCP, event ports.
- Asynchronous TCP and UDP sockets
- Asynchronous DNS resolution
- Asynchronous file and file system operations
- File system events
- ANSI escape code controlled TTY
- IPC with socket sharing, using Unix domain sockets or named pipes (Windows)
- Child processes
- Thread pool
- Signal handling
- High resolution clock
- Threading and synchronization primitives
The implementation of Libuv is a classic producer-consumer model. In the entire life cycle of Libuv, each round of the cycle will process the task queue maintained by each phase, and then execute the callbacks of the nodes in the task queue one by one. In the callback, new tasks are continuously produced, thereby continuously driving Libuv.
The following is the overall execution process of Libuv
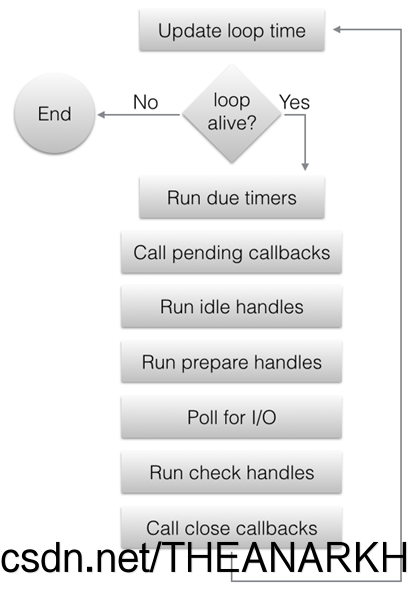
From the above figure, we roughly understand that Libuv is divided into several stages, and then continuously performs the tasks in each stage in a loop. Let's take a look at each stage in detail.
-
Update the current time. At the beginning of each event loop, Libuv will update the current time to the variable. The remaining operations of this cycle can use this variable to obtain the current time to avoid excessive Too many system calls affect performance, the additional effect is that the timing is not so precise. But in a round of event loop, Libuv will actively update this time when necessary. For example, when returning after blocking the timeout time in epoll, it will update the current time variable again.
-
If the event loop is in the alive state, start processing each stage of the event loop, otherwise exit the event loop.
What does alive state mean? If there are handles in the active and ref states, the request in the active state or the handle in the closing state, the event loop is considered to be alive (the details will be discussed later).
-
timer stage: determine which node in the minimum heap has timed out, execute its callback.
-
pending stage: execute pending callback. Generally speaking, all IO callbacks (network, file, DNS) will be executed in the Poll IO stage, but in some cases, the callback of the Poll IO stage will be delayed until the next loop execution, so this callback is executed in the pending stage For example, if there is an error in the IO callback or the writing of data is successful, the callback will be executed in the pending phase of the next event loop.
-
Idle stage: The event loop will be executed every time (idle does not mean that the event loop will be executed when it is idle).
-
The prepare phase: similar to the idle phase.
-
Poll IO stage: call the IO multiplexing interface provided by each platform (for example, epoll mode under Linux), wait for the timeout time at most, and execute the corresponding callback when returning.
The calculation rule of timeout:
- timeout is 0 if the time loop is running in UV_RUN_NOWAIT mode.
- If the time loop is about to exit (uv_stop was called), timeout is 0.
- If there is no active handle or request, the timeout is 0.
- If there are nodes in the queue with the idle phase, the timeout is 0.
- If there is a handle waiting to be closed (that is, uv_close is adjusted), the timeout is 0.
- If none of the above is satisfied, take the node with the fastest timeout in the timer phase as timeout.
- If none of the above is satisfied, the timeout is equal to -1, that is, it will block until the condition is satisfied.
- Check stage: same as idle and prepare. 9. Closing phase: Execute the callback passed in when calling the uv_close function. 10. If
Libuv is running in UV_RUN_ONCE mode, the event loop is about to exit. But there is a situation that the timeout value of the Poll IO stage is the value of the node in the timer stage, and the Poll IO stage is returned because of the timeout, that is, no event occurs, and no IO callback is executed.
At this time, it needs to be executed once timer stage. Because a node timed out. 11. One round of event loop ends. If Libuv runs in UV_RUN_NOWAIT or UV_RUN_ONCE mode, it exits the event loop. If it runs in UV_RUN_DEFAULT mode and the status is alive, the next round of loop starts. Otherwise exit the event loop.
Below I can understand the basic principle of libuv through an example.
    #include
    #include

    int64_t counter = 0;

    void wait_for_a_while(uv_idle_t* handle) {
        counter++;
        if (counter >= 10e6)
            uv_idle_stop(handle);
    }

    int main() {
        uv_idle_t idler;
         // Get the core structure of the event loop. and initialize an idle
        uv_idle_init(uv_default_loop(), &idler);
        // Insert a task into the idle phase of the event loop uv_idle_start(&idler, wait_for_a_while);
        // Start the event loop uv_run(uv_default_loop(), UV_RUN_DEFAULT);
        // Destroy libuv related data uv_loop_close(uv_default_loop());
        return 0;
    }
To use Libuv, we first need to obtain uv_loop_t, the core structure of Libuv. uv_loop_t is a very large structure, which records the data of the entire life cycle of Libuv. uv_default_loop provides us with a uv_loop_t structure that has been initialized by default. Of course, we can also allocate one and initialize it ourselves.
    uv_loop_t* uv_default_loop(void) {
      // cache if (default_loop_ptr != NULL)
        return default_loop_ptr;

      if (uv_loop_init(&default_loop_struct))
        return NULL;

      default_loop_ptr = &default_loop_struct;
      return default_loop_ptr;
    }
Libuv maintains a global uv*loop_t structure, which is initialized with uv_loop_init, and does not intend to explain the uv_loop_init function, because it probably initializes each field of the uv_loop_t structure. Then we look at the functions of the uv_idle* series.
1 uv_idle_init
    int uv_idle_init(uv_loop_t* loop, uv_idle_t* handle) {
        /*
          Initialize the type of handle, belong to the loop, mark UV_HANDLE_REF,
          And insert handle into the end of the loop->handle_queue queue */
        uv__handle_init(loop, (uv_handle_t*)handle, UV_IDLE);
        handle->idle_cb = NULL;
        return 0;
    }
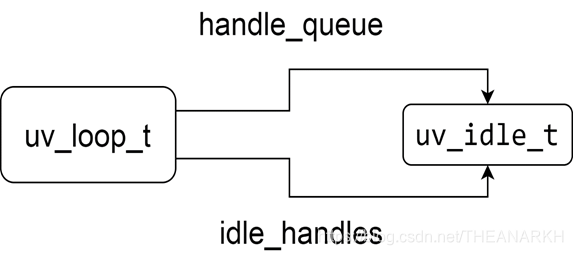
After executing the uv_idle_init function, the memory view of Libuv is shown in the following figure

2 uv_idle_start
    int uv_idle_start(uv_idle_t* handle, uv_idle_cb cb) {
      // If the start function has been executed, return directly if (uv__is_active(handle)) return 0;
       // Insert the handle into the idle queue in the loop QUEUE_INSERT_HEAD(&handle->loop->idle_handles, &handle->queue);
       // Mount the callback, which will be executed in the next cycle handle->idle_cb = cb;
       /*
         Set the UV_HANDLE_ACTIVE flag bit, and increase the number of handles in the loop by one,
        When init, just mount the handle to the loop, when start, the handle is in the active state*/
       uv__handle_start(handle);
       return 0;
     }
The memory view after executing uv_idle_start is shown in the following figure.
Then execute uv_run to enter Libuv's event loop.
    int uv_run(uv_loop_t* loop, uv_run_mode mode) {
      int timeout;
      int r;
      int ran_pending;
      // Submit the task to loop before uv_run
      r = uv__loop_alive(loop);
      // no tasks to process or uv_stop called
      while (r != 0 && loop->stop_flag == 0) {
        // Process the idle queue uv__run_idle(loop);
      }

      // exited because uv_stop was called, reset the flag
      if (loop->stop_flag != 0)
        loop->stop_flag = 0;
      /*
        Returns whether there are still active tasks (handle or request),
        The agent can execute uv_run again
      */
      return r;
When the handle queue, Libuv will exit. Later, we will analyze the principle of Libuv event loop in detail.
1.1.3 Other third-party libraries
The third-party libraries in Node.js include asynchronous DNS parsing (cares), HTTP parser (the old version uses http_parser, the new version uses llhttp), HTTP2 parser (nghttp2), decompression and compression library (zlib ), encryption and decryption library (openssl), etc., not introduced one by one.
1.2 How Node.js works
1.2.1 How does Node.js extend JS functionality?
V8 provides a mechanism that allows us to call the functions provided by C++ and C language modules at the JS layer. It is through this mechanism that Node.js realizes the expansion of JS capabilities. Node.js does a lot of things at the bottom layer, implements many functions, and then exposes the interface to users at the JS layer, which reduces user costs and improves development efficiency.
1.2.2 How to add a custom function in V8?
    // Define Handle in C++ Test = FunctionTemplate::New(cb);
    global->Set(String::New("Test"), Test);
    // use const test = new Test() in JS;
We first have a perceptual understanding. In the following chapters, we will specifically explain how to use V8 to expand the functions of JS.
1.2.3 How does Node.js achieve expansion?
Node.js does not expand an object for each function, and then mounts it in a global variable, but expands a process object, and then expands the js function through process.binding. Node.js defines a global JS object process, which maps to a C++ object process, and maintains a linked list of C++ modules at the bottom layer. JS accesses the C++ process object by calling the process.binding of the JS layer, thereby accessing the C++ module ( Similar to accessing JS's Object, Date, etc.). However, Node.js version 14 has been changed to the internalBinding method, and the C++ module can be accessed through the internalBinding. The principle is similar.
1.3 Node.js startup process
The following is the main flowchart of Node.js startup, as shown in Figure 1-4.
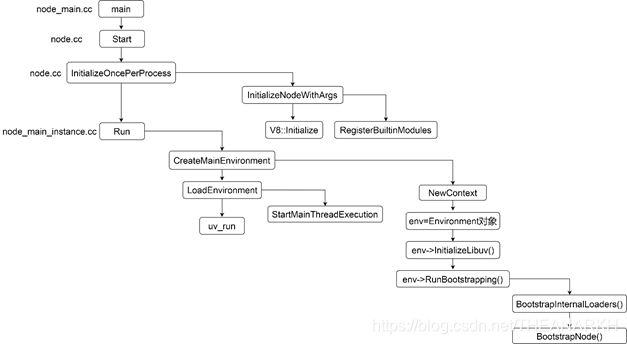
Let's go from top to bottom and look at what each process does.
1.3.1 Registering C++ modules
The function of the RegisterBuiltinModules function (node_binding.cc) is to register C++ modules.
    void RegisterBuiltinModules() {
    #define V(modname) _register_##modname();
      NODE_BUILTIN_MODULES(V)
    #undef V
    }
NODE_BUILTIN_MODULES is a C language macro, which is expanded as follows (omitting similar logic)
    void RegisterBuiltinModules() {
    #define V(modname) _register_##modname();
      V(tcp_wrap)
      V(timers)
      ...other modules #undef V
    }
Further expand as follows
void RegisterBuiltinModules() {
 _register_tcp_wrap();
 _register_timers();
 }
A series of functions starting with _register are executed, but we cannot find these functions in the Node.js source code, because these functions are defined by macros in the file defined by each C++ module (the last line of the .cc file). Take the tcp_wrap module as an example to see how it does it. The last sentence of the code in the file tcp_wrap.cc NODE_MODULE_CONTEXT_AWARE_INTERNAL(tcp_wrap, node::TCPWrap::Initialize) macro expansion is
#define NODE_MODULE_CONTEXT_AWARE_INTERNAL(modname, regfunc)
 NODE_MODULE_CONTEXT_AWARE_CPP(modname,
regfunc,
nullptr,
NM_F_INTERNAL)
Continue to expand
#define NODE_MODULE_CONTEXT_AWARE_CPP(modname, regfunc, priv, flags
 static node::node_module _module = {
 NODE_MODULE_VERSION,
 flags,
 nullptr,
 **FILE**,
 nullptr,
 (node::addon_context_register_func)(regfunc),
 NODE_STRINGIFY(modname),
 priv,
 nullptr};
 void _register_tcp_wrap() { node_module_register(&_module); }
We see that the bottom layer of each C++ module defines a function starting with _register. When Node.js starts, these functions will be executed one by one. Let's continue to look at what these functions do, but before that, let's take a look at the data structures that represent C++ modules in Node.js.
    struct node_module {
      int nm_version;
      unsigned int nm_flags;
      void* nm_dso_handle;
      const char* nm_filename;
      node::addon_register_func nm_register_func;
      node::addon_context_register_func nm_context_register_func;
      const char* nm_modname;
      void* nm_priv;
      struct node_module* nm_link;
    };
We see that the function at the beginning of _register calls node_module_register and passes in a node_module data structure, so let's take a look at the implementation of node_module_register
void node_module_register(void* m) {
struct node_module* mp = reinterpret_cast (m);
if (mp->nm_flags & NM_F_INTERNAL) {
mp->nm_link = modlist_internal;
modlist_internal = mp;
} else if (!node_is_initialized) {
mp->nm_flags = NM_F_LINKED;
mp->nm_link = modlist_linked;
modlist_linked = mp;
} else {
thread_local_modpending = mp;
}
}
We only look at AssignToContext and CreateProperties, set_env_vars will explain the process chapter.
1.1 AssignToContext
    inline void Environment::AssignToContext(v8::Local context,
                                             const ContextInfo& info) {
      // Save the env object in the context context->SetAlignedPointerInEmbedderData(ContextEmbedderIndex::kEnvironment, this);
      // Used by Environment::GetCurrent to know that we are on a node context.
      context->SetAlignedPointerInEmbedderData(ContextEmbedderIndex::kContextTag, Environment::kNodeContextTagPtr);
    }
AssignToContext is used to save the relationship between context and env. This logic is very important, because when the code is executed later, we will enter the field of V8. At this time, we only know Isolate and context. If we don't save the relationship between context and env, we don't know which env we currently belong to. Let's see how to get the corresponding env.
    inline Environment* Environment::GetCurrent(v8::Isolate* isolate) {
      v8::HandleScope handle_scope(isolate);
      return GetCurrent(isolate->GetCurrentContext());
    }

    inline Environment* Environment::GetCurrent(v8::Local context) {
      return static_cast (
          context->GetAlignedPointerFromEmbedderData(ContextEmbedderIndex::kEnvironment));
    }
1.2 CreateProperties
Next, let's take a look at the logic of creating a process object in CreateProperties.
      Isolate* isolate = env->isolate();
     EscapableHandleScope scope(isolate);
     Local context = env->context();
     // Apply for a function template Local process_template = FunctionTemplate::New(isolate);
     process_template->SetClassName(env->process_string());
     // Save the function Local generated by the function template process_ctor;
     // Save the object Local created by the function generated by the function module process;
     if (!process_template->GetFunction(context).ToLocal(&process_ctor)|| !process_ctor->NewInstance(context).ToLocal(&process)) {
       return MaybeLocal ();
     }
The object saved by the process is the process object we use in the JS layer. When Node.js is initialized, some properties are also mounted.
    READONLY_PROPERTY(process,
                      "version",
                      FIXED_ONE_BYTE_STRING(env->isolate(),
                                            NODE_VERSION));
    READONLY_STRING_PROPERTY(process, "arch", per_process::metadata.arch);......
After creating the process object, Node.js saves the process to env.
    Local process_object = node::CreateProcessObject(this).FromMaybe(Local ());
    set_process_object(process_object)
1.3.3 Initialize Libuv task
The logic in the InitializeLibuv function is to submit a task to Libuv.
void Environment::InitializeLibuv(bool start*profiler_idle_notifier) {
HandleScope handle_scope(isolate());
Context::Scope context_scope(context());
CHECK_EQ(0, uv_timer_init(event_loop(), timer_handle()));
uv_unref(reinterpret_cast (timer_handle()));
uv_check_init(event_loop(), immediate_check_handle());
uv_unref(reinterpret_cast (immediate_check_handle()));
uv_idle_init(event_loop(), immediate_idle_handle());
uv_check_start(immediate_check_handle(), CheckImmediate);
uv_prepare_init(event_loop(), &idle_prepare_handle*);
uv*check_init(event_loop(), &idle_check_handle*);
uv*async_init(
event_loop(),
&task_queues_async*,
[](uv*async_t* async) {
Environment* env = ContainerOf(
&Environment::task_queues_async*, async);
env->CleanupFinalizationGroups();
env->RunAndClearNativeImmediates();
});
uv*unref(reinterpret_cast (&idle_prepare_handle*));
uv*unref(reinterpret_cast (&idle_check_handle*));
uv*unref(reinterpret_cast (&task_queues_async*));
// …
}
These functions are all provided by Libuv, which are to insert task nodes into different stages of Libuv, and uv_unref is to modify the state.
1 timer_handle is the data structure that implements the timer in Node.js, corresponding to the time phase of Libuv 2 immediate_check_handle is the data structure that implements setImmediate in Node.js, corresponding to the check phase of Libuv.
3 task queues_async is used for sub-thread and main thread communication.
1.3.4 Initialize Loader and Execution Contexts
s.binding = function binding(module) {
  module = String(module);
  if (internalBindingWhitelist.has(module)) {
    return internalBinding(module);
  }
  throw new Error(`No such module: ${module}`);
};
Mount the binding function in the process object (that is, the process object we usually use). This function is mainly used for built-in JS modules, which we will often see later. The logic of binding is to find the corresponding C++ module according to the module name. The above processing is for Node.js to load C++ modules through the binding function at the JS layer. We know that there are native JS modules (JS files in the lib folder) in Node.js. Next, let's take a look at the processing of loading native JS modules. Node.js defines a NativeModule class that is responsible for loading native JS modules. A variable is also defined to hold the list of names of native JS modules.
static map = new Map(moduleIds.map((id) => [id, new NativeModule(id)]));
The main logic of NativeModule is as follows: 1. The code of the native JS module is converted into characters and stored in the node_javascript.cc file. The NativeModule is responsible for the loading of the native JS module, that is, compilation and execution. 2 Provide a require function to load native JS modules. For modules whose file paths start with internal, they cannot be required by users.
This is the general logic of native JS module loading. Specifically, we will analyze it in the Node.js module loading chapter. After executing internal/bootstrap/loaders.js, finally return three variables to the C++ layer.
return {
  internalBinding,
  NativeModule,
  require: nativeModuleRequire,
};
The C++ layer saves two of the functions, which are used to load the built-in C++ module and the function of the native JS module respectively.
    set_internal_binding_loader(internal_binding_loader.As ());
    set_native_module_require(require.As ());
So far, internal/bootstrap/loaders.js is analyzed.
2 Initialize the execution context
BootstrapNode is responsible for initializing the execution context, the code is as follows
EscapableHandleScope scope(isolate*);
// Get global variables and set the global property Local global = context()->Global();
global->Set(context(), FIXED_ONE_BYTE_STRING(isolate*, "global"), global).Check();
Parameters process, require, internalBinding, primordials when executing internal/bootstrap/node.js
std::vector > node_params = {
process_string(),
require_string(),
internal_binding_string(),
primordials_string()};
std::vector > node_args = {
process_object(),
// native module loader native_module_require(),
// C++ module loader internal_binding_loader(),
primordials()};
     MaybeLocal result = ExecuteBootstrapper(
         this, "internal/bootstrap/node", &node_params, &node_args);
Set a global property on the global object, which is the global object we use in Node.js. Then execute internal/bootstrap/node.js to set some variables (refer to internal/bootstrap/node.js for details).
process.cpuUsage = wrapped.cpuUsage;
process.resourceUsage = wrapped.resourceUsage;
process.memoryUsage = wrapped.memoryUsage;
process.kill = wrapped.kill;
process.exit = wrapped.exit;
set global variable
defineOperation(global, 'clearInterval', timers.clearInterval);
defineOperation(global, 'clearTimeout', timers.clearTimeout);
defineOperation(global, 'setInterval', timers.setInterval);
defineOperation(global, 'setTimeout', timers.setTimeout);
ObjectDefineProperty(global, 'process', {
value: process,
enumerable: false,
writable: true,
configurable: true
});
1.3.5 Execute the user JS file
StartMainThreadExecution to perform some initialization work, and then execute the user JS code.
- Mount attributes to the process object
Execute the patchProcessObject function (exported in node_process_methods.cc) to mount some attributes to the process object, not listed one by one.
    // process.argv
    process->Set(context,
                        FIXED_ONE_BYTE_STRING(isolate, "argv"),
              ToV8Value(context, env->argv()).ToLocalChecked()).Check();

    READONLY_PROPERTY(process,
                      "pid",
              Integer::New(isolate, uv_os_getpid()));
Because Node.js adds support for threads, some properties need to be hacked. For example, when process.exit is used in a thread, a single thread is exited instead of the entire process, and functions such as exit need special handling. Later chapters will explain in detail.
- Handling inter-process communication
function setupChildProcessIpcChannel() {
  if (process.env.NODE_CHANNEL_FD) {
    const fd = parseInt(process.env.NODE_CHANNEL_FD, 10);
    delete process.env.NODE_CHANNEL_FD;
    const serializationMode =
      process.env.NODE_CHANNEL_SERIALIZATION_MODE || "json";
    delete process.env.NODE_CHANNEL_SERIALIZATION_MODE;
    require("child_process")._forkChild(fd, serializationMode);
  }
}
The environment variable NODE_CHANNEL_FD is set when the child process is created. If it is indicated that the currently started process is a child process, inter-process communication needs to be handled.
- I will think deeply or look at its implementation. As we all know, when a server starts, it will listen to a port, which is actually a new socket. Then if a connection arrives, we can get the socket corresponding to the new connection through accept.
Is this socket and the listening socket the same? In fact, sockets are divided into listening type and communication type. On the surface, the server uses one port to realize multiple connections, but this port is used for monitoring, and the bottom layer is used for communication with the client is actually another socket. So every time a connection comes over, the socket responsible for monitoring finds that it is a packet (syn packet) that establishes a connection, and it will generate a new socket to communicate with (the one returned when accepting).
The listening socket only saves the IP and port it is listening on. The communication socket first copies the IP and port from the listening socket, and then records the client's IP and port. When a packet is received next time, the operating system will Find the socket from the socket pool according to the quadruple to complete the data processing.
The serial mode is to pick a node from the queue that has completed the three-way handshake, and then process it. Pick another node and process it again. If there is blocking IO in the process of processing, you can imagine how low the efficiency is. And when the amount of concurrency is relatively large, the queue corresponding to the listening socket will soon be full (the completed connection queue has a maximum length). This is the simplest mode, and although it is certainly not used in the design of the server, it gives us an idea of the overall process of a server handling requests.
1.4.2 Multi-process mode
In serial mode, all requests are queued and processed in one process, which is the reason for inefficiency. At this time, we can divide the request to multiple processes to improve efficiency, because in the serial processing mode, if there is a blocking IO operation, it will block the main process, thereby blocking the processing of subsequent requests. In the multi-process mode, if a request blocks a process, the operating system will suspend the process, and then schedule other processes to execute, so that other processes can perform new tasks. There are several types in multi-process mode.
-
The main process accepts, the child process processes the request
In this mode, the main process is responsible for extracting the node that has completed the connection, and then handing over the request corresponding to this node to the child process for processing. The logic is as follows.
    while(1) {
        const socketForCommunication = accept(socket);
        if (fork() > 0) {
             continue;
            // parent process } else {
            // child process handle(socketForCommunication);
        }
    }
In this mode, every time a request comes, a new process will be created to handle it. This mode is slightly better than serial. Each request is processed independently. Assuming that a request is blocked in file IO, it will not affect the processing of b request, and it is as concurrent as possible. Its bottleneck is that the number of processes in the system is limited. If there are a large number of requests, the system cannot handle it. Furthermore, the overhead of the process is very large, which is a heavy burden for the system.
- Process Pool Mode Creating and destroying processes in real time is expensive and inefficient, so the process pool mode is derived. The process pool mode is to create a certain number of processes in advance when the server starts, but these processes are worker processes. It is not responsible for accepting requests. It is only responsible for processing requests. The main process is responsible for accept, and it hands the socket returned by accept to the worker process for processing, as shown in the figure below.

However, compared with the mode in 1, the process pool mode is relatively complicated, because in mode 1, when the main process receives a request, it will fork a child process in real time. At this time, the child process will inherit the new request in the main process. The corresponding fd, so it can directly process the request corresponding to the fd.
In the process pool mode, the child process is created in advance. When the main process receives a request, the child process cannot get the fd corresponding to the request. of. At this time, the main process needs to use the technique of passing file descriptors to pass the fd corresponding to this request to the child process. A process is actually a structure task_struct. In JS, we can say it is an object. It has a field that records the open file descriptor. When we access a file descriptor, the operating system will be based on the value of fd.
Find the underlying resource corresponding to fd from task_struct, so when the main process passes the file descriptor to the child process, it passes more than just a number fd, because if you only do this, the fd may not correspond to any resources in the child process, Or the corresponding resources are inconsistent with those in the main process. The operating system does a lot of things for us. Let us access the correct resource through fd in the child process, that is, the request received in the main process.
- child process accept
This mode is not to wait until the request comes and then create the process. Instead, when the server starts, multiple processes are created. Then multiple processes call accept respectively. The architecture of this mode is shown in Figure 1-8.
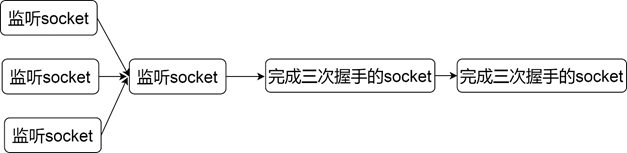
    const socketfd = socket (configuration such as protocol type);
    bind(socketfd, listening address)

    for (let i = 0 ; i < number of processes; i++) {
        if (fork() > 0) {
            // The parent process is responsible for monitoring the child process} else {
            // The child process handles the request listen(socketfd);
            while(1) {
                const socketForCommunication = accept(socketfd);
                handle(socketForCommunication);
            }
        }
    }
In this mode, multiple child processes are blocked in accept. If a request arrives at this time, all child processes will be woken up, but the child process that is scheduled first will take off the request node first. After the subsequent process is woken up, it may encounter that there is no request to process, and enter again. Sleep, the process is woken up ineffectively, which is the famous phenomenon of shocking herd. The improvement method is to add a lock before accept, and only the process that gets the lock can accept, which ensures that only one process will be blocked in accept. Nginx solves this problem, but the new version of the operating system has solved this problem at the kernel level. Only one process will be woken up at a time. Usually this pattern is used in conjunction with event-driven.
1.4.3 Multi-threading mode
Multi-threading mode is similar to multi-process mode, and it is also divided into the following
types:
- main process accept
- create sub-thread processing
- sub-thread accept
- The first two thread pools are the same as in the multi-process mode, but the third one is special, and we mainly introduce the third one. In the subprocess mode, each subprocess has its own task_struct, which means that after fork, each process is responsible for maintaining its own data, while the thread is different. The thread shares the data of the main thread (main process). , when the main process gets an fd from accept, if it is passed to the thread, the thread can operate directly. So in the thread pool mode, the architecture is shown in the following figure.
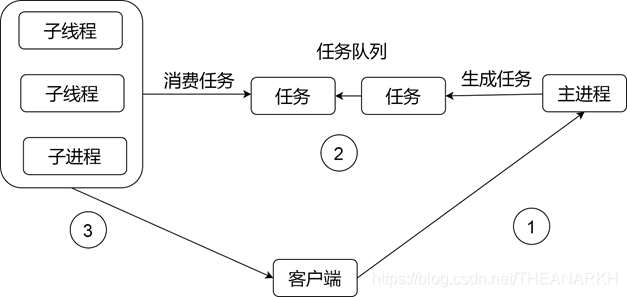
The main process is responsible for accepting the request, and then inserting a task into the shared queue through mutual exclusion. The child threads in the thread pool also extract nodes from the shared queue for processing through mutual exclusion.
1.4.4 Event-driven
Many servers (Nginx, Node.js, Redis) are now designed using the event-driven pattern. We know from previous design patterns that in order to handle a large number of requests, the server needs a large number of processes/threads. This is a very large overhead.
The event-driven mode is generally used with a single process (single thread). But because it is a single process, it is not suitable for CPU intensive, because if a task keeps occupying the CPU, subsequent tasks cannot be executed. It is more suitable for IO-intensive (generally provides a thread pool, responsible for processing CPU or blocking tasks). When using the multi-process/thread mode, a process/thread cannot occupy the CPU all the time.
After a certain period of time, the operating system will perform task scheduling. Let other threads also have the opportunity to execute, so that the previous tasks will not block the later tasks and starvation will occur. Most operating systems provide event-driven APIs. But event-driven is implemented differently in different systems. So there is usually a layer of abstraction to smooth out this difference. Here is an example of Linux epoll.
    // create an epoll
    var epollFD = epoll_create();
    /*
     Register an event of interest for a file descriptor in epoll, here is the listening socket, register a readable event, that is, the connection is coming event = {
        event: readable fd: